In this blogpost I will take you through the entire process of printing the fun snake by Olya Tsikhanchuk! Before you start make sure you download your work chart here and have your freeeeee stencil template printed out. You can find your free download here.
I love how every time screen printing teaches me more and surprises me. At first I wanted to start with printing the body part of the snake but since I don’t like to print layer on layer (I feel there is more chance on bleeding when you print layer on layer. You can prevent this by fixating every layer but I personally like to print in one go) I decided to start with the eyes first and build it up from there. I use the cut-outs to protect the already printed layers from the next layer. Say what?? Lemme show you, it’s so fun!

Let’s start with cutting our stencils. You can scale them, if necessairy, to fit your project. I like to cut just as many stencils as layers. Of course you can also combine more layers on one stencil like we do in our book on page 72-73.

Make sure your tee/sweater/whatever is washed (even when it is brand new) and ironed. And don’t forget the bounce layer. I have a solid piece of cardboard with an old piece of fleece taped on it that is super easy to slide into tees and stuff!

Cut out your guide and place it on your sweater (last page of the free template). Make sure it is true to size!
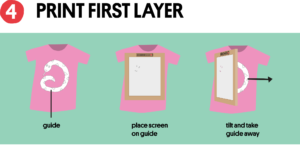
Tape the first stencil to the screen. Place it on the guide, when it is in the right position, tilt the screen and remove the guide. Place screen back. Print away! Clean your screen and stencil.
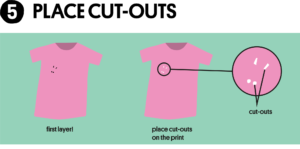
Make sure the first layer is dry. If not pour yourself a drink and wait or use a blowdryer. Place cut out on printed layer. Be precise, you’ll thank me later ;).

Eyeball where to place the eyeballs (haha). The pupil of the snake are great guides. Make sure the cut-outs you placed on the first layer don’t move.

Place only the stencil (no screen) on the sweater so you can use this as a guide. Place all the triangle shaped cut-outs on the snakes body. Also place the cut outs of the eyes and nostrils over your first two printed layers. Remove stencil very caaaaarefully. Now tape stencil to screen. Place screen and print! Tilt ultra slow.
Wash screen and makes sure you keep all the little cut outs so you can print a gazillion more snakes later on!

Aaaalmost done but what’s a snake without it’s tongue? I like to use the cut-out of the tongue stencil as a guide for the tongue. Tape the stencil to the screen and place the screen exactly on the cut out. Tilt the screen to take away the cut-out of the tongue. Place the screen back and print away. Wash everything up, make sure your screen and stencils dry flat.
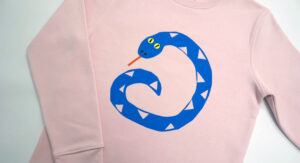
Your ssssnake is all done! We are so proud of you!
Don’t forget to set your ink and wear it with pride (softly whispering or shouting I MADE THIS!)
Things I used for this project:
My trusty Maxi and Mega screen.
Our eco inks yellow, blue, black and for the tongue we mixed our orange and red, you can find all our 22 colors here.
This GOAT sweater (spoiled myself, not sponsored).
I like to cut my stencils with an x-acto knife and use a A3 cutting mat, you can get both at any local art store. Our stencils are also compatible with a cutting plotter such as cameo silhouette, cri cut, brother etc.
I printed this in 34 seconds (proof below), aaah just kidding. Cutting the stencils was about 20 minutes and printing 40 min., including cleaning the screens in between obv. Always remember you don’t have to finish a project in one go, divide it in smaller chunks if that fits better: cut stencils one day(s), prepare your colors another time and print later on. Let our work chart guide you.
Admire Olya’s work here.
You can find all our (fun guaranteed) downloads here.
Our book is full of aaalll the tips and tricks and a gazillion amazing projects,
get it here.
We’d love to see your snakes or anything else you make with our kit! Show us with #wearebobbinhood.
XO Barbara aka Bobbinhood